Client implementations
actinia-python-client
Python library to access an actinia server easily via python. See also source code and full documentation
Installation
VERSION="0.1.2"

pip3 install "actinia-python-client @ https://github.com/actinia-org/actinia-python-client/releases/download/${VERSION}/actinia_python_client-${VERSION}-py3-none-any.whl"
Quickstart
Connecting actinia Python library with actinia
from actinia import Actinia

actinia_mundialis = Actinia()
actinia_mundialis.get_version()
or connect to actinia-dev with version 3:
from actinia import Actinia

actinia_dev_mundialis = Actinia("https://actinia-dev.mundialis.de/", "v3")
actinia_dev_mundialis.get_version()
Set authentication to get access to the actinia functionallity
actinia_mundialis.set_authentication("demouser", "gu3st!pa55w0rd")
Location Management
With the location management the locations can be requested as well as information of each location. Also a location can be created and deleted if the user is permitted.
Get locations and locaton information of a special location:
locations = actinia_mundialis.get_locations()
print(locations.keys())
locations["nc_spm_08"].get_info()
# or
actinia_mundialis.locations["nc_spm_08"].get_info()
Create a new location
(Attention: The demouser is not permitted to create or delete a location!)
new_location = actinia_mundialis.create_location("test_location", 25832)
print(new_location.name)
print(new_location.region)
print([loc for loc in actinia_mundialis.locations])
Delete a location
(Attention: The demouser is not permitted to create or delete a location!)
actinia_mundialis.locations["test_location"].delete()
print([loc for loc in actinia_mundialis.locations()])
Mapset Management
With the mapset management the mapsets of a specified location can be requested as well as information of each mapset.
Upcoming: Create and delete mapsets if the user is permitted.
Get Mapsets of Specified Location
Get mapsets of the nc_spm_08 location:
mapsets = actinia_mundialis.locations["nc_spm_08"].get_mapsets()
print(mapsets.keys())
Raster, Vector and STRDS Management
Raster manangement
Get all rasters of the PERMANENT mapsets
rasters = mapsets["PERMANENT"].get_raster_layers()
print(rasters.keys())
Get information of the raster zipcodes
info = rasters["zipcodes"].get_info()
Upload a GTif as raster layer to a user mapset (here the user mapset will be created before)
# TODO add mapset creation
mapset_name = "test_mapset"

# upload tif
raster_layer_name = "test"
file = "/home/testuser/data/elevation.tif"
locations["nc_spm_08"].mapsets[mapset_name].upload_raster(raster_layer_name, file)
print(locations["nc_spm_08"].mapsets[mapset_name].raster_layers.keys())
Delete a raster layer
locations["nc_spm_08"].mapsets[mapset_name].delete_raster(raster_layer_name)
print(locations["nc_spm_08"].mapsets[mapset_name].raster_layers.keys())

# TODO delete mapset
Vector manangement
Get all vector maps of the PERMANENT mapsets
vectors = mapsets["PERMANENT"].get_vector_layers()
print(vectors.keys())
Get information of the vector boundary_county
info = vectors["boundary_county"].get_info()
Upload a GeoJSON as vector layer to a user mapset (here the user mapset will be created before)
# TODO add mapset creation
mapset_name = "test_mapset"

# upload tif
vector_layer_name = "test"
file = "/home/testuser/data/firestations.geojson"
locations["nc_spm_08"].mapsets[mapset_name].upload_vector(vector_layer_name, file)
print(locations["nc_spm_08"].mapsets[mapset_name].vector_layers.keys())
Delete a raster layer
locations["nc_spm_08"].mapsets[mapset_name].delete_vector(vector_layer_name)
print(locations["nc_spm_08"].mapsets[mapset_name].vector_layers.keys())

# TODO delete mapset
Process Chain Validation
A process chain can be validated before a job is started.
First connecting actinia Python library with actinia and set authentication:
from actinia import Actinia

actinia_mundialis = Actinia()
actinia_mundialis.get_version()
actinia_mundialis.set_authentication("demouser", "gu3st!pa55w0rd")

# request all locations
locations = actinia_mundialis.get_locations()
Synchronous process chain validation
pc = {
    "list": [
      {
          "id": "r_mapcalc",
          "module": "r.mapcalc",
          "inputs": [
              {
                  "param": "expression",
                  "value": "elevation=42"
              }
          ]
      }
    ],
    "version": "1"
}
pc = {"list": [{"id": "r_mapcalc","module": "r.mapcalc","inputs": [{"param": "expression","value": "elevation=42"}]}],"version": "1"}
actinia_mundialis.locations["nc_spm_08"].validate_process_chain_sync(pc)
Asynchronous process chain validation:
pc = {
    "list": [
      {
          "id": "r_mapcalc",
          "module": "r.mapcalc",
          "inputs": [
              {
                  "param": "expression",
                  "value": "elevation=42"
              }
          ]
      }
    ],
    "version": "1"
}
pc = {"list": [{"id": "r_mapcalc","module": "r.mapcalc","inputs": [{"param": "expression","value": "elevation=42"}]}],"version": "1"}
val_job = actinia_mundialis.locations["nc_spm_08"].validate_process_chain_async(pc)
val_job.poll_until_finished()
print(val_job.status)
print(val_job.message)
Processing
Start a processing job with a valid process chain.
First connect actinia Python library with actinia and set authentication:
from actinia import Actinia

actinia_mundialis = Actinia()
actinia_mundialis.get_version()
actinia_mundialis.set_authentication("demouser", "gu3st!pa55w0rd")

# request all locations
locations = actinia_mundialis.get_locations()
Ephemeral Processing
Start an ephemeral processing job
pc = {
    "list": [
      {
          "id": "r_mapcalc",
          "module": "r.mapcalc",
          "inputs": [
              {
                  "param": "expression",
                  "value": "baum=5"
              }
          ]
      }
    ],
    "version": "1"
}
job = actinia_mundialis.locations["nc_spm_08"].create_processing_export_job(pc, "test")
job.poll_until_finished()

print(job.status)
print(job.message)
actinia Connector - a QGIS plugin
Introduction to the actinia Connector
The actinia Connector is a QGIS Plugin for actinia communication. With this plugin it is possible to connect to a running actinia instance, request locations, mapsets and detailed layer information. It is also possible to download maps directly into QGIS for further local processing and even to start processes. For ephemeral processing the plugin downloads the results directly.
This is still a development version but can be tested and used already.
The actinia connector is available from https://apps.mundialis.de/actinia_connector/plugins.xml, simply add this URL in QGIS under Plugins > Manage and install plugins > Settings > Plugin repositories > Add.
Project Setup
In the actinia Connector plugin you can create a new project or load an old one.
When a new project is created, a new project file is created. The user can set a project name and a data directory, where data created by the plugin are saved. Additional the actinia settings have to be set. These settings are the base url, user and password. As simple example you can select the https://actinia.mundialis.de/ with the demouser and password gu3st!pa55w0rd. But you can also use another actinia server or one you have set up yourself.
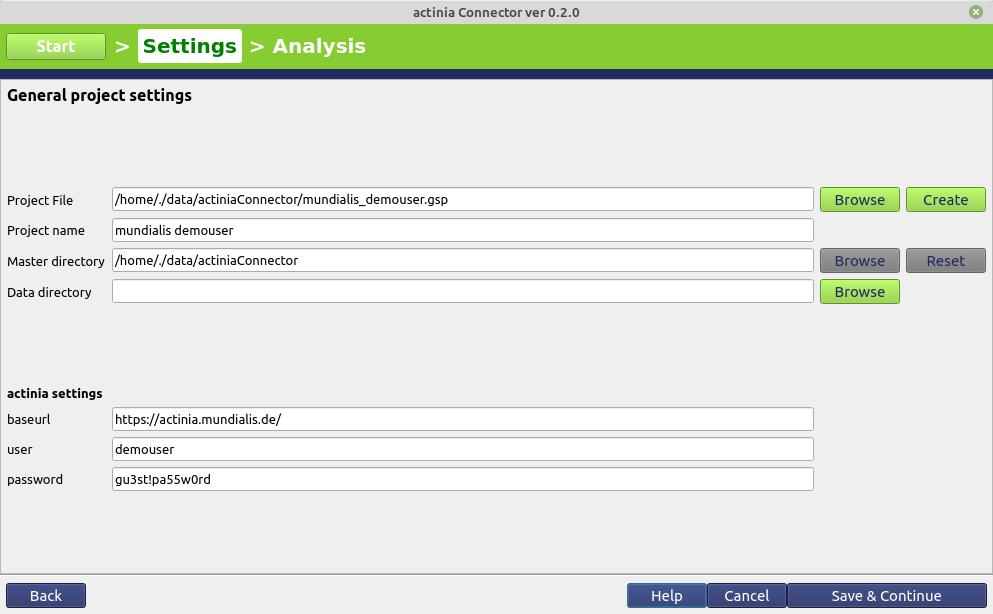
Fig. 10: actinia connector, project setup
Location management
In the location management screen you can query all locations available for you with the “Get locations” button and then select a location and query its information with the “Get selected location info (region and projection)” button or use this location in another tab for another functionality.
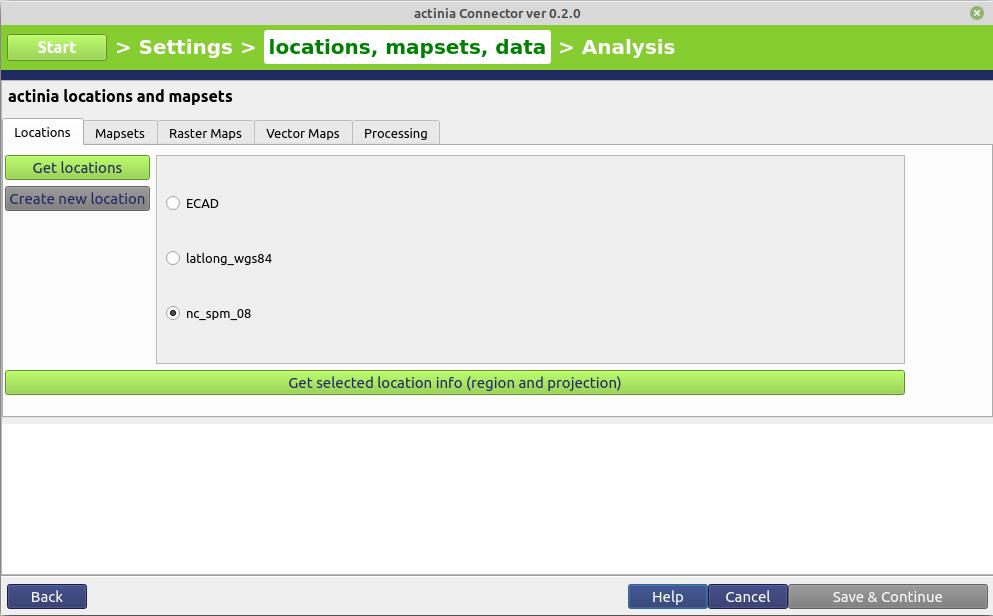
Fig. 11: actinia connector, location management
Mapset management
For mapset management a selected location (in the location tab) is required. From this location all mapsets available for the user can be queried with the “Get mapsets” button.
When selecting one of these mapsets, information can be queried with the “Get selected mapset info (region and projection)” button or the layer in this mapset can be used in the raster maps or vector maps tab.
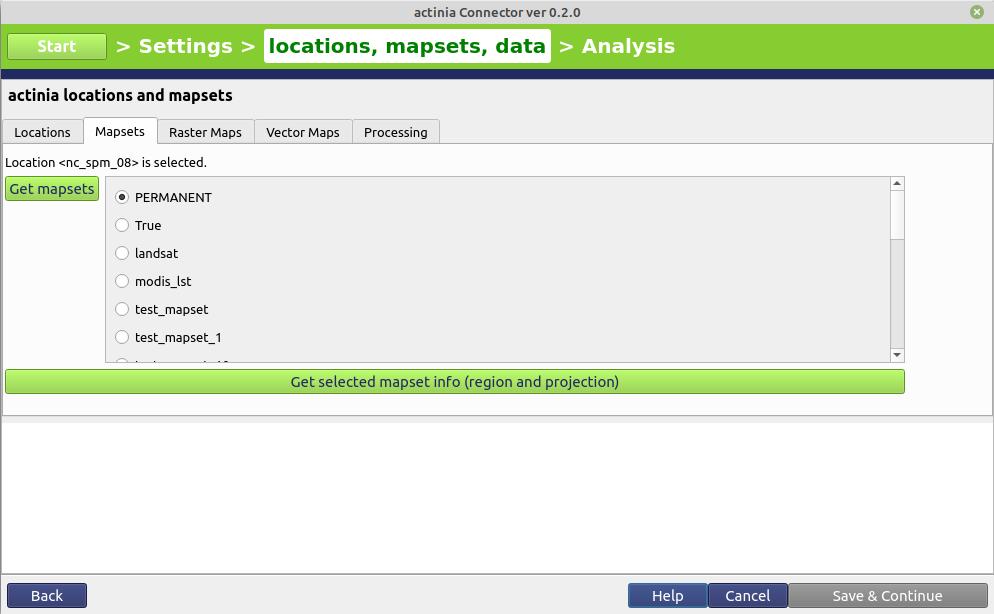
Fig. 12: actinia connector, mapset management
Raster management
For raster management, both a location and a mapset must be selected (these are displayed again at the top). With the “Get raster maps” button all raster layers can be listed.
If you select one of them, you can query the map information for it using the “Get selected raster map info” or import the raster map into QGIS. There are two ways to import a raster layer into QGIS. One is to simply use the button “Import selected raster map into QGIS” to import the entire raster map. There is also another possibility to select a layer in QGIS and then additionally select the radio button “by selected layer extent” to limit the extent of the raster map to be imported to the extent of the selected raster map. This extent can also be increased by a number of cells. However, care must be taken that the two maps overlap, otherwise an empty map will be imported into QGIS.
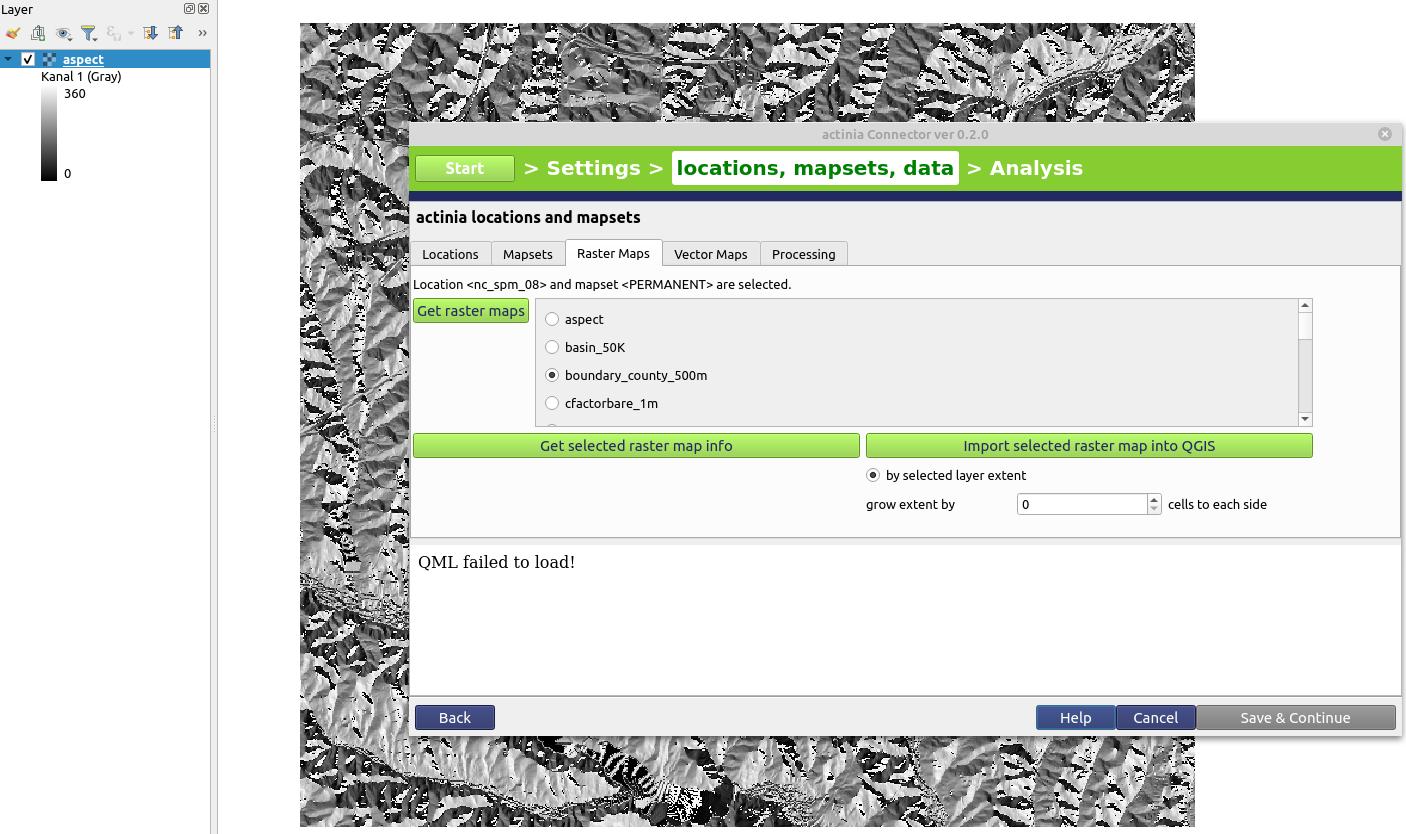
Fig. 13: actinia connector, raster management
Vector management
For vector management, both a location and a mapset must be selected (these are displayed again at the top). With the “Get vector maps” button all vector layers can be listed.
If you select one of them, you can query the map information for it using the “Get selected vector map info” or import the vector map into QGIS with the “Import selected vector map into QGIS” button.
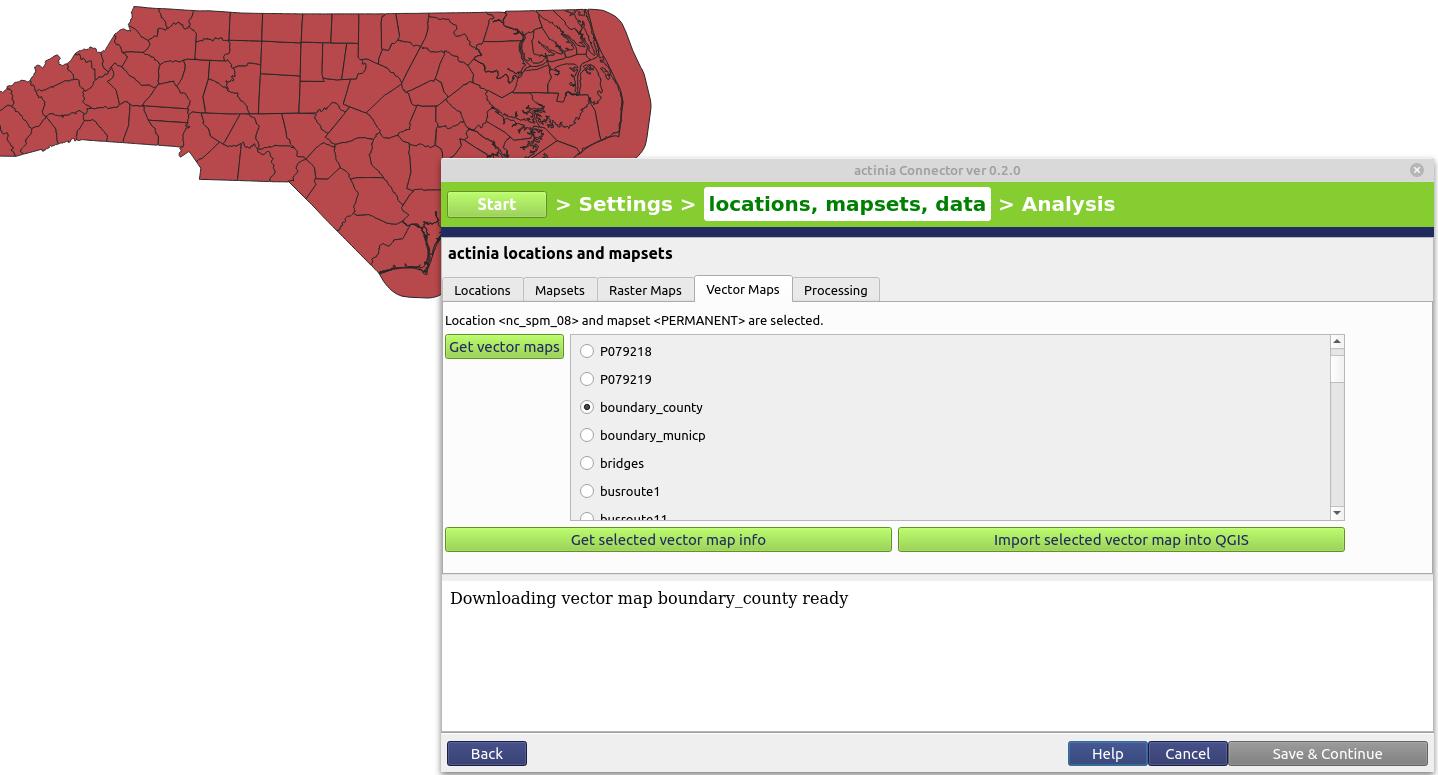
Fig. 14: actinia connector, vector management
Persistent and Ephemeral processing
For processing, a location must be selected (in the location tab). Via “Load process chain” a process chain can be uploaded as a file. This is then displayed on the right.
Before the processing can be started, the process type must also be selected. The process can be started as ephermeral or persistent process. If persistent processing is used, a mapset name must be entered in the empty text field. This can be a simple text e.g. “mapset_XY”. The mapset with this name is then created during the processing, and can be loaded afterwards via the tab mapsets.
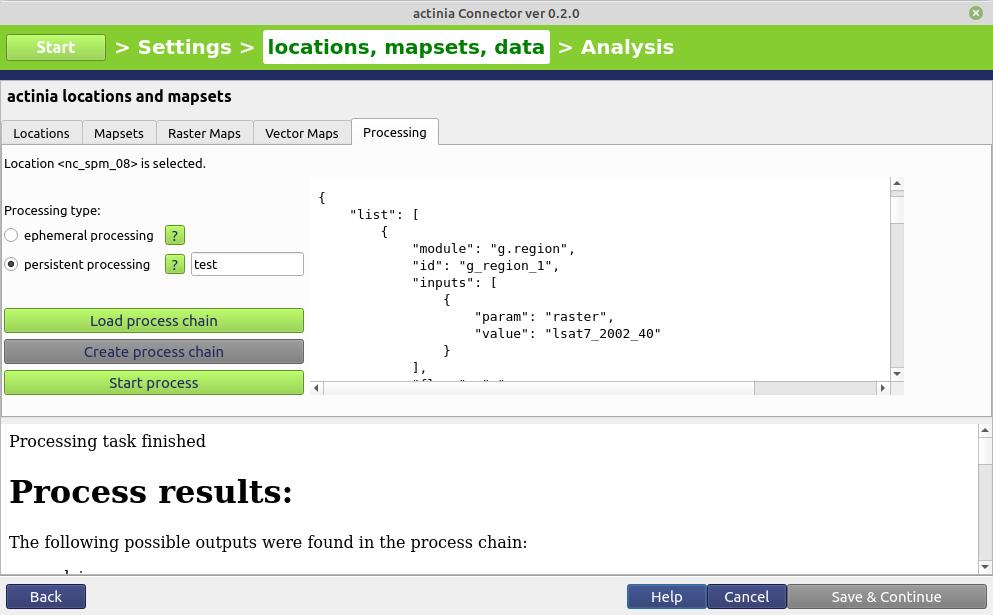
Fig. 15: actinia connector, persistent and ephemeral processing
actinia jupyter notebooks
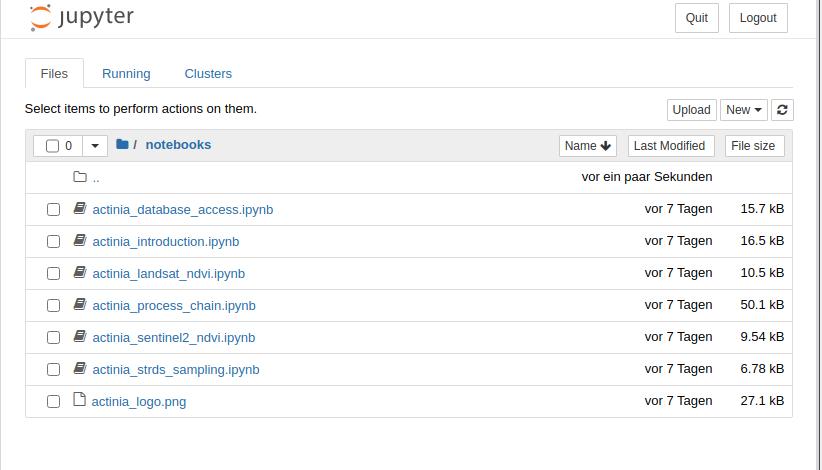
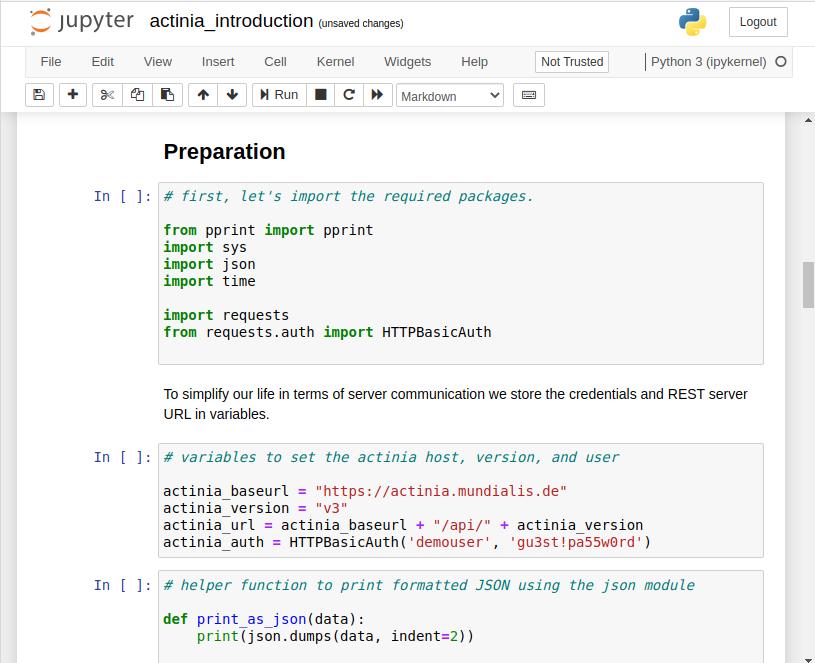
Jupyter Notebooks are server-client applications that allow code written in a notebook document to be edited and executed through a web browser. They can be run on a local computer that does not require internet access, as well as used to control computations on a remote server accessed via the Internet.
Jupyter notebooks can be interactive and are run through a web browser. They provide the ability to combine live code, explanatory text, and computational results into a single document. Jupyter Notebooks can be easily shared as documents.
You can find various actinia notebooks on GitHub.
Hint:
On error ImportError: cannot import name 'contextfilter' from 'jinja2' (/home/ctawalika/.local/lib/python3.8/site-packages/jinja2/__init__.py):
Remove pip packages with eg pip3 uninstall jinja2 notebook
and install them via package manager, e.g. with apt install python3-jinja2 python3-notebook